
One of the most important considerations in the cold months is a source of warmth. With gas prices staying stable for several years, gas fireplaces are the preferred choice of many homeowners. It is a popular way to add warmth and ambiance to the home. Apart from the price of running, gas fireplaces are excellent because of their efficiency. With these fireplaces, you can enjoy plenty of heat with minimal wastage. In this post, we show you how to install gas fireplaces.
Installing a fireplace can be expensive and dangerous if you don’t know what you are doing, and gas fireplaces are even more challenging to set up. However, with the tips and other information contained in this article, you will be armed to the teeth with the knowledge and resources required to successfully and safely install a gas fireplace.
Installing a gas fireplace on your own is a DIY project that requires expertise, care, and concentration. Before you try doing it, you must research the work needed and the instructions for installation.
Before we dive into the systematic consideration of how to fix it up, there are some important questions that you need to consider before you get started.
The first thing that you have to consider is whether you will install a direct vented or an unvented fireplace. These are the two major types of gas fireplaces on the market. In the direct vented model, a venting system is required for setting up the fireplace. On the other hand, there is no need for that with the unvented fireplace. Here is what you need to know to choose the best type for you to install.
Air quality is important to almost every homeowner, and if you want a fireplace that will not affect the air quality in the home, then a direct vent option is the best for you. These have an effective means of creating a warm point in the space without affecting the quality of air.
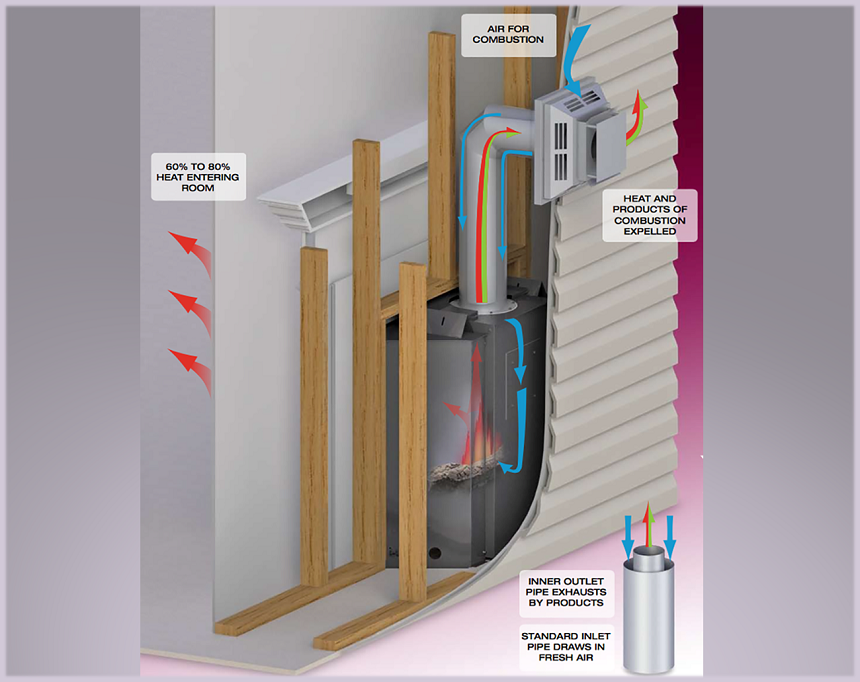
As the name implies, these come with a venting system. For the best models, they use a completely covered venting system to draw in fresh air to boost burning while removing any fumes and emissions and transferring them out of the home.
For these models, the front of the fireplace does not interact with space’s interior. This closing off ensures that the venting system removes all of the emissions and fumes that are created. With this design in place, gases cannot enter the living room.
In terms of heat provided, the direct vent fireplace gives out a good amount of heat. It also works up to 85% efficiently.
Installing this type of fireplace is relatively easy and you can set it up in different spots around the home, ranging from your basement to the bedroom.
When installing this type of fireplace, though, ensure that you check with the local authorities so that you don’t violate any regulations.
Direct venting fireplaces are also categorized into two groups – the co-axial venting and the co-linear venting.
Unless you are installing them into a preexisting chimney, these fireplaces will require that you cut into a wall or the ceiling during setup
Unvented fireplaces are also known as ventless fireplaces or vent-free fireplaces. These, according to many, offer an affordable source of heat to the user. It is economical and rather efficient. When compared to the vented fireplace, it is cheaper.
As the name implies, this type of fireplace does not need you to cut into the wall or the chimney. You don’t need any venting. The effect is that all of the heat produced in the fireplace stays in the space. You thus get better flexibility in the installation process.
How do these work? Well, these work by drawing in indoor air and returning it as heat. Most of the best models that you will find on the market can burn completely efficiently. Therefore, no gases remain after combustion has occurred.
Since you are not creating a vent, whether, through the ceiling or a wall, it is usually cheaper to install the unvented fireplace than the direct vent fireplace.
Another advantage offered by this type of fireplace is that you can install it in a wider variety of places. The Pleasant Hearth fireplace is a sterling example of an excellent unvented fireplace. It gives plenty of heat and comes with a programmable thermostat.
However, there are some reservations. For one, the byproducts from the combustion can flow freely into a living space. No wonder then, that this type of fireplace has stringent installation requirements. Also, the fumes produced or the odor after combustion might irritate your lungs.
Now that we have seen the features of the two, you have to decide which would be best for you.
If you have someone in your home with allergies, then it is not recommended that you install a ventless fireplace. The byproducts can exacerbate the allergies of such a person. Also, since the ventless option is open to the air, you might experience a higher level of humidity in the space. Therefore, you might have to complement it with a dehumidifier.
Without a vent, water vapor cannot escape, which can trap it in the walls, causing condensation to appear in the house, with the resultant growth of mold and mildew. If you want to use an unvented fireplace, then you might have to offer simple means of ventilation like open doors and windows.
Below is a handy video comparing the two types of gas fireplaces.
Apart from the type of fireplace that you are looking to install, another consideration is the duration of the installation.
There are different methods of installation, however, it is expected that installing a direct vented gas fireplace will take up at least two days.
The unvented fireplace is easier to install, and it will take lesser time for you to set it up.
Another important question is that of the cost of installing the fireplace. According to Fixr Trusted Source Gas Fireplace Installation Cost | Cost to Install Gas Fireplace Insert The average cost to install a gas fireplace is about $4,000 (direct vent fireplace, including inspections, installation of gas lines, log sets, and burners, installed). Find here detailed information about gas fireplace installation costs. www.fixr.com , the cost of your fireplace will depend on different factors. Let’s see what these are and the cost incurred.
According to reviews, the average cost of buying and installing a gas fireplace is between $2,500 to $6,000. The particular price is dependent on different factors like the model, the location, and the condition.
Gas fireplaces are excellent because of their ability to help you save on heating and ambiance. The cost will then depend on the size of the unit and the technology.
The gas log fireplace is made of ceramic logs in a pre-existing fireplace. If you are looking to spend as little as possible, then this is the best type for you. It will send the heat through the chimney that you already have. For most owners, the cost of setting this up lies between $450 to $850.
A gas fireplace insert is another type that can be installed. In this type, you can convert the wood-burning fireplace into a gas-burning fireplace by installing the gas-burning insert. They are also a cheaper alternative as they use a reduced amount of gas and are cheaper to operate over time. Installing these will cost from $580 to $900.
The last type in this section is the built-in gas fireplaces. These are similar to the gas insert models. However, the difference here is that you don’t need an existing vent or fireplace to use them. The downside is the cost as they might cost as high as $4000.
For most folks, doing the work of installing a fireplace themselves is just too much. However, with some DIY expertise and the right tools, materials, and instructions, you can turn what is seemingly complicated into something easy. In this section, we will show you the things that you need to set up your fireplace.
Tools:
Materials:
Once all of these are in place, then you are ready to install the fireplace yourself. Note that you might need some other materials depending on the model and type of fireplace to be installed. However, the materials above are the basic tools and materials needed.
In this section, we will describe a simple way of setting up the fireplace in your space. We will consider how to install a fireplace that lies in a box frame made from framing lumber. Lines transferring gas and electricity are extended to this wooden frame. It is also a description of a vented fireplace, with the flue running through the sidewall. After the installation of the fireplace, the walls of the frame are finished with drywall panels. The overall look is then finished with trimmed-out wooded moldings for a beautiful look.
With that overview in mind, let’s now take step-by-step instructions on the installation process of a fireplace.
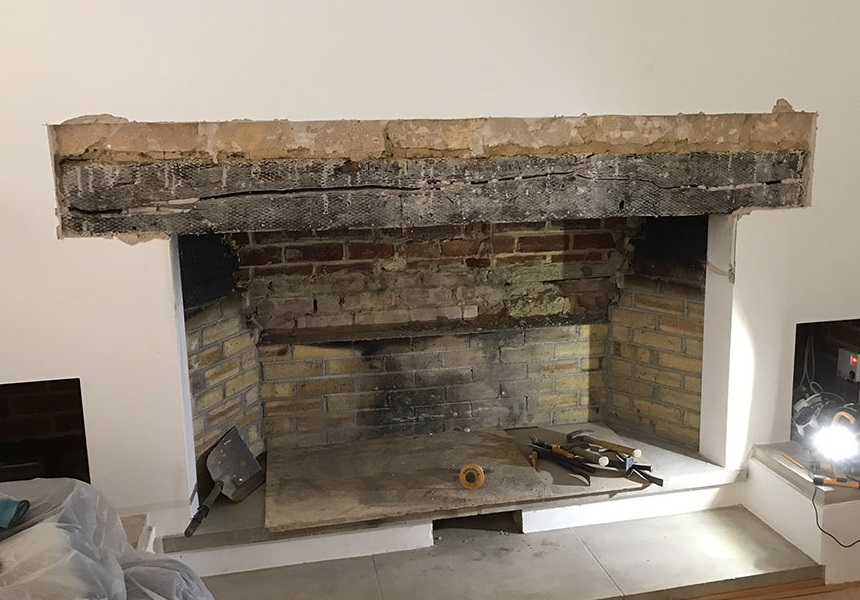
Before you start cutting or joining or doing anything else, the very first step is to plan where you will locate the fireplace. There are several ways to configure the installation of a fireplace, and there are several products on the market. Therefore, you should take the time to plan carefully. For instance, you might build a fireplace that goes into the exterior wall with the chunk of the product outside the. If you will be doing that, you need to create a box for the part that will be visible outside.
Another instance is where you create a fireplace that lies in a frame made along the interior wall of the space. This way might not affect how the home looks outside, but inside, it might gobble up plenty of space. Some products have been discovered to sit in a frame located in a corner of the space. As you can see, there are several things to keep in mind.
To choose the location, one helpful tip is to create a model of the fireplace using cardboard or something similar, then placing it in different places around the space to know the best place to install it. Afterward, you can buy the unit and use the specifications of the product to install it correctly.
The next thing to do is to create where the unit will lie on. You very well cannot set a hot unit like that on the floor framing without damaging the framing. Therefore, the next thing to do is to create a pedestal base using the lumber and plywood materials. This should be created following the instructions from the fireplace. You will join the pieces of the pedestal using nails or screws.
Next, position the fireplace on the pedestal. Depending on the unit that you buy, this might be heavy. Therefore, you might need a helping hand. After positioning the fireplace, use a thin bead of silicone caulk around the vent collar at the apex of the firebox. After doing that, slide the pipe segment over the collar. Follow the instructions from the manufacturer to lock the segment correctly.
Many of the fireplaces on the market today have vents at the back, so you have to open the wall. Use the vent that extends from the firebox and make a bend that passes through the back wall and reduce the heat that passes through to the wall. ends in a vent cap. This is an important step and you should do so carefully, using plates that will.
Now that you have opened the wall, it is time to use sheet metal screws to put the vent pipe sections together. If the segments are too long, you can trim them down using the aviation shears.
The vent pipe comes in an L shape and lies within the wall frame. It is held in place with collars that will stop the pipe from touching the wood framing. You will screw the collars to the vent frame then extend the vent pipe through them. After that, close the gaps between the pipe and the collars with your silicone caulk and follow the attachment instructions from the manufacturer.
The fireplace runs on gas, so you need to run the gas lines. Before setting the frame around the fireplace, employ the services of a plumber to run the gas lines. Most of the time, the plumber runs extends the existing lines of the house. When running the lines, ensure that they place the shutoff valve in an easily accessible location.
The walls will usually be opened to lay the pipes.
Some gas fireplaces are versatile and come with electric controls. Reviews hail the Duluth Forge DFS-300R-2GR as one of the best fireplaces with electric controls on the market. If the product that you bought has this, then hire an electrician to help you run or extend a circuit to the unit. If the location of the fireplace hinders an existing outlet, then the outlet should be removed and the cables rerouted.
With the manufacturers’ instructions in place, create the frame. You will need the lumber for the frame construction. Manufacturers usually have strict instructions on the height above the ground that the unit should lie and the clearances between the unit and the wall. These should be followed as they are for your safety.
Constructing the fireplace frame is relatively simple and there are different ways you can do it. If the vent goes out the back wall of it extends through to the roof, then you need to construct a frame that would keep those considerations in mind. When building the frame, ensure that the frame gives you access to shutoff valves or panels in the fireplace.
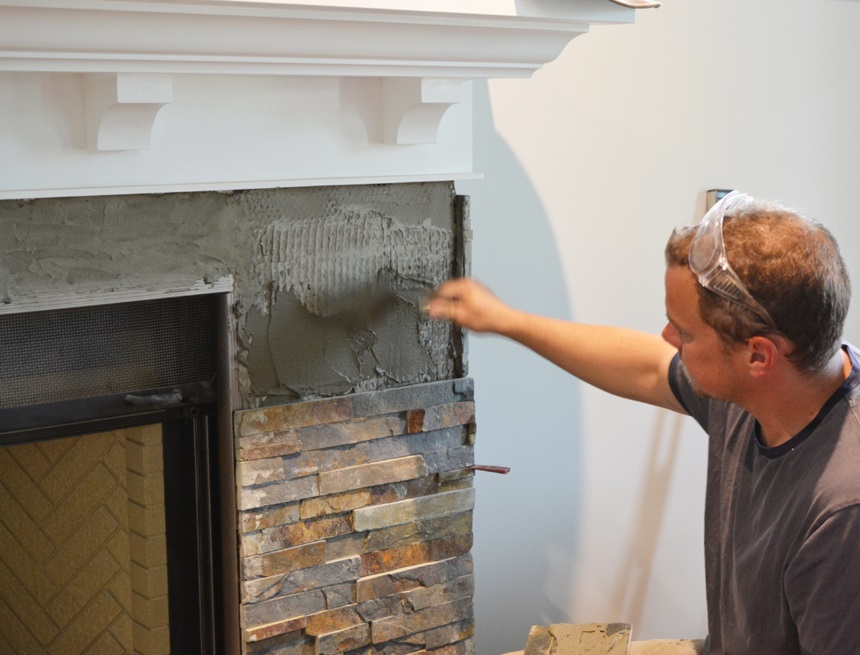
The walls are finished with drywall panels. If the frame lies below the ceiling, cover the top of the frame with plywood. If ceramic tile will be used in the surrounding area finish, then use the cement backer board to cover frame studs.
After all the steps above have been completed, complete the trim using the wood trim that you desire. The miter saw and hammer or nailer come in very handy here.
While installing a fireplace can be tricky and costly, with a bit of DIY expertise, the right tools and materials, and the correct information, you can learn how to install gas fireplaces. We hope that this info article helps you with setting up your dream gas fireplace.